Hey, wanna make cool 2D Games that are easy to run and easy to code without all the hassle of installing a huge game engine that will bloat up your computer memory!? Well, have I got just the thing for you! Introducing MonoGame, the ultra lite and powerful C# game framework. MonoGame is the open source fork of XNA. XNA was originally developed by Microsoft for making games on Xbox Live Indie Arcade. Now it is open sourced and modernized and can target most modern consoles, from the PS4, Nintendo Switch, and iOS/Android devices. MonoGame also has a lot of acclaimed titles that showcase how powerful it is.
Today we're going to be making a classic arcade game often referred to as Breakout or Arkanoid.
let's get started. You'll first need 2 things:
- Visual Studio IDE
- Monogame Library
First download Visual Studio Community Edition from here.
After you finish installing that, you can install the Monogame library here.
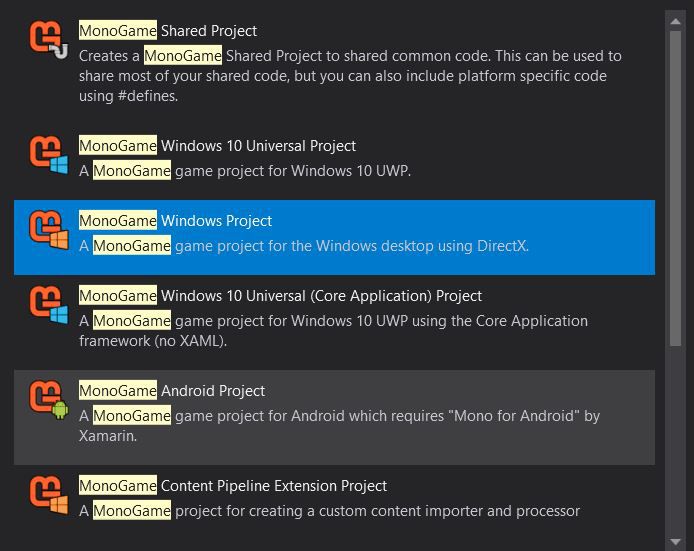
When you finish setting everything up, set up a new Monogame Desktop Project for this tutorial we will be using the Windows project but feel free to choose other platforms.
Give it a name (I called mine AsteroidGame) and proceed.
Next we are going to then add a few classes. In order to make a class, go to the solution explorer, right click the first name, and click "New Item." Then choose the first item that pops up, which is a C# class.
Alternatively you can hit Ctrl+Shift+N to add it on Windows.
We're going to be doing this 6 times. We shall call these classes:
- Ball.cs
- Paddle.cs
- Wall.cs
- GameContent.cs
- GameBorder.cs
- Brick.cs
When you create these classes, go ahead and add these 4 using statements at the top of each class:
using Microsoft.Xna.Framework;
using Microsoft.Xna.Framework.Graphics;
using Microsoft.Xna.Framework.Input;
using Microsoft.Xna.Framework.Audio;
Once created, you can leave them alone for just a minute. We'll get back to them later.
First let's look at our Game1 class and add some lines of code. Add these 2 pieces of code on the top of the class right before the class name:
public class Game1 : Game
    {
        //Mouse and Keyboard Controls
        private MouseState oldmouse;
        private KeyboardState oldkeyboard;
Next in the LoadContent() Method, we shall add the following code:
// Create a new SpriteBatch, which can be used to draw textures.

            spriteBatch = new SpriteBatch(GraphicsDevice);

            gameContent = new GameContent(Content);
            screenWidth = GraphicsAdapter.DefaultAdapter.CurrentDisplayMode.Width;
            screenHeight = GraphicsAdapter.DefaultAdapter.CurrentDisplayMode.Height;
            //set game to 502x700 or screen max if smaller
            if (screenWidth >= 510)
            {
                screenWidth = 510;
            }
            if (screenHeight >= 710)
            {
                screenHeight = 710;
            }
            graphics.PreferredBackBufferWidth = screenWidth;
            graphics.PreferredBackBufferHeight = screenHeight;
            graphics.ApplyChanges();
This code changes the width and height of the screen and also gives us our boundaries so that the ball for our game won't go off screen. Now, let's leave this class alone and load in our content.
We're going to be loading all our game objects, the things we see and interact with, through the GameContent.cs Class.
These objects are just going to be simple png files, and for bells and whistles, some sound effects to spice up our game. No need for animations, we just wanna keep it nice and simple.
Here's an open link to the game assets through my Github.
Now it's time to put MonoGame's library to good use.
We will load everything through this GUI window that MonoGame has conveniently provided for us. It's super convenient and is way easier than having to route everything from your own directories.
Go ahead and open the Content.mgcb icon right here.

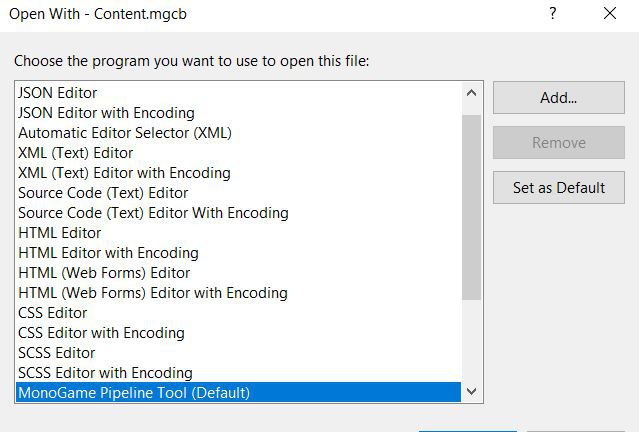
If the Content.mgcb file opens up to be a text file instead of the GUI, right-click, press "open with," and then look for the "Monogame Pipeline Tool" option. Make sure to set as default so you don't have to deal with right-clicking and opening it back up again. The reason why this happens in VS2019 is that it doesn't interpret the .mgcb correctly.
Once you do that and you get the GUI up, it's time to upload our content. Next, right click the "Content" button on the top next to the Monogame Icon, hover over Add > New Item. Click Existing Item and from there you'll be able to upload your content. Left Click and select all the project files and click "Open" on the selection.
You should have all the files under the "Content" folder. Then hit the "Build" Icon on the top right to load them into your project. It should look like this and you should get no errors.
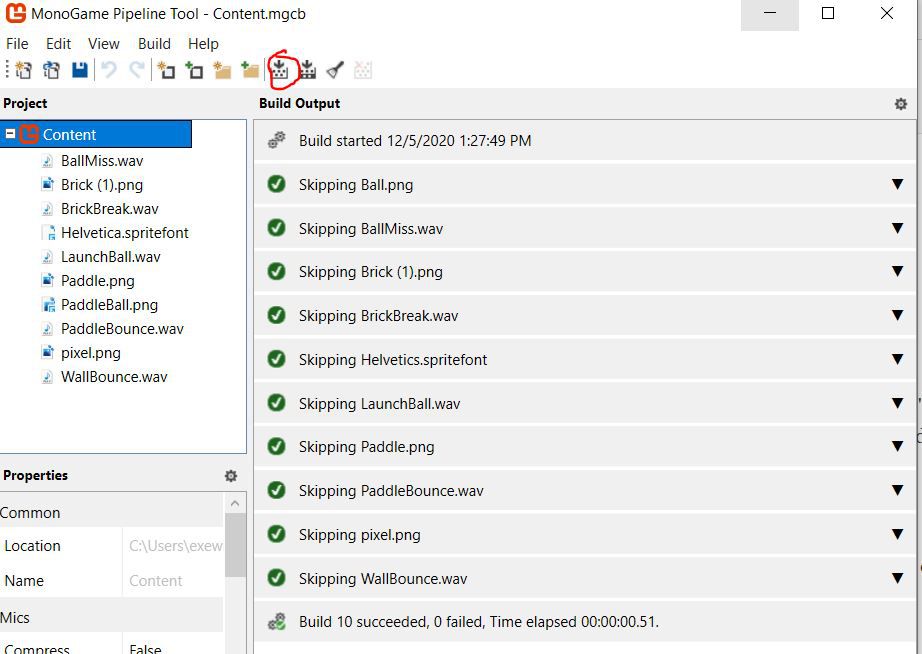
Cool! Now all we have to do is add our SpriteFont, which will be our game's UI text.
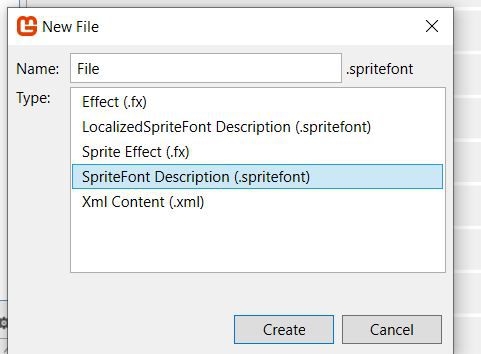
You can just name it to anything. I called mine "Helvetica."
Ok. Now that that's done, let's go into our GameContent.cs class. Here is what your version should look like.
So let's talk about what we're doing here. The SoundEffect and Texture2D are a part of MonoGame's Graphics and Audio libraries that lets us manipulate image sound files to do orthodox things like animation and play sound, or more specific things like stretching our sprite and distorting audio.
It is recommended you use .wav and .png files whenever possible For best quality with things like transparency issues and static waves . The public GameContent (ContentManager Content) method is what lets us pass in our content from the pipeline and makes it public for the rest of our program to use. And from there we just load our content with the Load<ContentType>(string nameofContent) function provided to load our content. That is literally it for this class.
Now let's go to our Paddle.cs class.
using System;
using System.Collections.Generic;
using System.Linq;
using System.Text;
using System.Threading.Tasks;
using Microsoft.Xna.Framework;
using Microsoft.Xna.Framework.Audio;
using Microsoft.Xna.Framework.Graphics;
using Microsoft.Xna.Framework.Input;
namespace AsteroidGame
{
    class Paddle
    {
        public float X { get; set; } //x position of paddle on screen
        public float Y { get; set; } //y position of paddle on screen
        public float Width { get; set; } //width of paddle
        public float Height { get; set; } //height of paddle
        public float ScreenWidth { get; set; } //width of game screen

        private Texture2D imgPaddle { get; set; }  //cached image of the paddle
        private SpriteBatch spriteBatch;  //allows us to write on backbuffer when we need to draw self
        // All the overloads in the public Paddle let the rest of the game be able to interact with the cariables of the Paddle
        public Paddle(float x, float y, float screenWidth, SpriteBatch spriteBatch, GameContent gameContent)
        {
            X = x;
            Y = y;
            imgPaddle = gameContent.Paddle;
            Width = imgPaddle.Width;
            Height = imgPaddle.Height;
            this.spriteBatch = spriteBatch;
            ScreenWidth = screenWidth;
        }

        public void Draw()
        {
            spriteBatch.Draw(imgPaddle, new Vector2(X, Y), null, Color.White, 0, new Vector2(0, 0), 1.0f, SpriteEffects.None, 0);
        }
        public void MoveLeft()
        {
            X = X - 4;
            if (X < 1)
            {
                X = 1;
            }
        }
        public void MoveRight()
        {
            X = X + 4;
            if ((X + Width) > ScreenWidth)
            {
                X = ScreenWidth - Width;
            }
        }
        public void MoveTo(float x)
        {
            if (x >= 0)
            {
                if (x < ScreenWidth - Width)
                {
                    X = x;
                }
                else
                {
                    X = ScreenWidth - Width;
                }
            }
            else
            {
                if (x < 0)
                {
                    X = 0;
                }
            }
        }
    }
}
This is all we'll be doing for our Paddle class. The MoveLeft() and MoveRight() Functions is what will make the paddle move, and the X float that has passed into a Vector2 has helped us do that in our public Paddle() Reference. So we are done with the paddle!
Now let's move onto our Brick.cs Class.
using System.Collections.Generic;
using System.Linq;
using Microsoft.Xna.Framework;
using Microsoft.Xna.Framework.Graphics;

namespace AsteroidGame
{
    class Brick
    {
        /// <summary>
        ///  2 floats are used for brick position
        ///  bool Visible is used for seeing if the brick is still on the screen
        ///  Color is to allow for the brick to be able to change color for multiple instances of the brick
        /// </summary>
        public float X { get; set; } //x position of brick on screen
        public float Y { get; set; } // Brick Position
        public float Width { get; set; } //width of brick
        public float Height { get; set; } //height of brick
        public bool Visible { get; set; } // Declares if the Brick is destroyed or when it collides with our ball.
        private Color color;
        private Texture2D imgBrick { get; set; }
        private SpriteBatch spriteBatch;  //Allows us to write on backbuffer when we need to draw the brick

        public Brick(float x, float y, Color color, SpriteBatch spriteBatch, GameContent gameContent)
        {
            X = x;
            Y = y;
            imgBrick = gameContent.BrickTexture;
            Width = imgBrick.Width;
            Height = imgBrick.Height;
            this.spriteBatch = spriteBatch;
            Visible = true;
            this.color = color;
        }
        public void Draw()
        {
            if (Visible)
            {
                spriteBatch.Draw(imgBrick, new Vector2(X, Y), null, color, 0, new Vector2(0, 0), 1.0f, SpriteEffects.None, 0);
            }
        }
    }
}
This is our main goal to destroy. Bricks. We use bool Visible to declare when we want to get rid of it and return it so it can leave the execution. We pass in the "Color" class inherited from the Graphics library so we change it to each column for our Wall.cs class. Not much to say about this, so let's move on to our Wall.
using Microsoft.Xna.Framework;
using Microsoft.Xna.Framework.Audio;
using Microsoft.Xna.Framework.Graphics;
using Microsoft.Xna.Framework.Input;
namespace AsteroidGame
{
    class Wall
    {
        public Brick[,] BrickWall { get; set; }

        public Wall(float x, float y, SpriteBatch spriteBatch, GameContent gameContent)
        {
            BrickWall = new Brick[7, 10];
            float brickX = x;
            float brickY = y;
            Color color = Color.White;
            for (int i = 0; i < 7; i++)
            {
                switch (i)
                {
                    case 0:
                        color = Color.Red;
                        break;
                    case 1:
                        break;
                    case 2:
                        color = Color.GhostWhite;
                        break;
                    case 3:
                        color = Color.Gold;
                        break;
                    case 4:
                        color = Color.Aqua;
                        break;
                    case 5:
                        color = Color.MonoGameOrange;
                        break;
                    case 6:
                        color = Color.Khaki;
                        break;
                }
                brickY = y + i * (gameContent.BrickTexture.Height + 1);

                for (int j = 0; j < 10; j++)
                {
                    brickX = x + j * (gameContent.BrickTexture.Width);
                    Brick brick = new Brick(brickX, brickY, color, spriteBatch, gameContent);
                    BrickWall[i, j] = brick;
                }

            }
        }
        public void Draw()
        {
            for (int i = 0; i < 7; i++)
            {
                for (int j = 0; j < 10; j++)
                {
                    BrickWall[i, j].Draw();
                }

            }


        }
    }
}
The Wall.cs class basically clones our Brick.cs class in a 7 x 10 set, as indicated by our BrickWall range. We then use a for loop and switch statements to change the colors of each tile and not have to reuse brand new Brick pngs, which will save up memory.
Ok. Now let's move onto the GameBorder.cs class.
using Microsoft.Xna.Framework;
using Microsoft.Xna.Framework.Audio;
using Microsoft.Xna.Framework.Graphics;
using Microsoft.Xna.Framework.Input;
namespace AsteroidGame
{
    class GameBorder
    {
        public float Width { get; set; } //width of game
        public float Height { get; set; } //height of game

        private Texture2D imgPixel { get; set; }
        private SpriteBatch spriteBatch;

        public GameBorder(float screenWidth, float screenHeight, SpriteBatch spriteBatch, GameContent gameContent)
        {
            Width = screenWidth;
            Height = screenHeight;
            imgPixel = gameContent.Pixel;
            this.spriteBatch = spriteBatch;
        }

        public void Draw()
        {
            spriteBatch.Draw(imgPixel, new Rectangle(0, 0, (int)Width - 1, 1), Color.Black);  //draw top border
            spriteBatch.Draw(imgPixel, new Rectangle(0, 0, 1, (int)Height - 1), Color.Black);  //draw left border
            spriteBatch.Draw(imgPixel, new Rectangle((int)Width - 1, 0, 1, (int)Height - 1), Color.Black);  //draw right border
        }
    }
}
This class is basically what we'll use to keep everything in bounds. This will keep the Ball, Paddle, and Wall of Bricks altogether.
Now let's move onto our final component, the Ball class. This is the main component of our game loop in order to hit the ball from the paddle and beat the game
using System;
using System.Collections.Generic;
using System.Linq;
using System.Text;
using System.Threading.Tasks;
using Microsoft.Xna.Framework;
using Microsoft.Xna.Framework.Audio;
using Microsoft.Xna.Framework.Graphics;
using Microsoft.Xna.Framework.Input;

namespace AsteroidGame
{
    class Ball
    {
        public float X { get; set; }
        public float Y { get; set; }
        public float XVelocity { get; set; }
        public float YVelocity { get; set; }
        public float Height { get; set; }
        public float Width { get; set; }
        public float Rotation { get; set; }
        public bool UseRotation { get; set; }
        public float ScreenWidth { get; set; } //width of game screen
        public float ScreenHeight { get; set; } //height of game screen
        public bool Visible { get; set; }  //is ball visible on screen
        public int Score { get; set; }
        public int bricksCleared { get; set; } //number of bricks cleared this level

        private Texture2D imgBall { get; set; }
        private SpriteBatch spriteBatch;  //allows us to write on backbuffer when we need to draw self
        private GameContent gameContent;

        public Ball(float screenWidth, float screenHeight, SpriteBatch spriteBatch, GameContent gameContent)
        {
            X = 0;
            Y = 0;
            XVelocity = 0;
            YVelocity = 0;
            Rotation = 0;
            imgBall = gameContent.Ball;
            Width = imgBall.Width;
            Height = imgBall.Height;
            this.spriteBatch = spriteBatch;
            this.gameContent = gameContent;
            ScreenWidth = screenWidth;
            ScreenHeight = screenHeight;
            Visible = false;
            Score = 0;
            bricksCleared = 0;
            UseRotation = true;
        }

        public void Draw()
        {

            if (Visible == false)
            {
                return;
            }
            if (UseRotation)
            {
                Rotation += .1f;
                if (Rotation > 3 * Math.PI)
                {
                    Rotation = 0;
                }
            }
            spriteBatch.Draw(imgBall, new Vector2(X, Y), null, Color.White, Rotation, new Vector2(Width / 2, Height / 2), 1.0f, SpriteEffects.None, 0);
        }

        public void Launch(float x, float y, float xVelocity, float yVelocity)
        {
            PlaySound(gameContent.BallLaunch);
            if (Visible == true)
            {
                return;  //ball already exists, ignore
            }
            Visible = true;
            X = x;
            Y = y;
            XVelocity = xVelocity;
            YVelocity = yVelocity;
        }
        public static void PlaySound(SoundEffect sound)
        {
            float volume = 1;
            float pitch = 0.0f;
            float pan = 0.0f;
            sound.Play(volume, pitch, pan);
        }
        public bool Move(Wall wall, Paddle paddle)
        {
            if (Visible == false)
            {
                return false;
            }
            X = X + XVelocity;
            Y = Y + YVelocity;

            //check for wall hits
            if (X < 1)
            {
                PlaySound(gameContent.Wallhit);
                X = 1;
                XVelocity = XVelocity * -1;
            }
            if (X > ScreenWidth - Width + 5)
            {
                PlaySound(gameContent.Wallhit);
                X = ScreenWidth - Width + 5;
                XVelocity = XVelocity * -1;
            }
            if (Y < 1)
            {
                PlaySound(gameContent.Wallhit);
                Y = 1;
                YVelocity = YVelocity * -1;
            }
            if (Y > ScreenHeight)
            {
                PlaySound(gameContent.Wallhit);
                Visible = false;
                Y = 0;
                return false;
            }


            Rectangle paddleRect = new Rectangle((int)paddle.X, (int)paddle.Y, (int)paddle.Width, (int)paddle.Height);
            Rectangle ballRect = new Rectangle((int)X, (int)Y, (int)Width, (int)Height);
            if (HitTest(paddleRect, ballRect))
            {
                PlaySound(gameContent.PaddleHit);
                int offset = Convert.ToInt32((paddle.Width - (paddle.X + paddle.Width - X + Width / 2)));
                offset = offset / 5;
                if (offset < 0)
                {
                    offset = 0;
                }
                switch (offset)
                {
                    case 0:
                        XVelocity = -6;
                        break;
                    case 1:
                        XVelocity = -5;
                        break;
                    case 2:
                        XVelocity = -4;
                        break;
                    case 3:
                        XVelocity = -3;
                        break;
                    case 4:
                        XVelocity = -2;
                        break;
                    case 5:
                        XVelocity = -1;
                        break;
                    case 6:
                        XVelocity = 1;
                        break;
                    case 7:
                        XVelocity = 2;
                        break;
                    case 8:
                        XVelocity = 3;
                        break;
                    case 9:
                        XVelocity = 4;
                        break;
                    case 10:
                        XVelocity = 5;
                        break;
                    default:
                        XVelocity = 6;
                        break;
                }
                YVelocity = YVelocity * -1;
                Y = paddle.Y - Height + 1;
                return true;
            }
            bool hitBrick = false;
            for (int i = 0; i < 7; i++)
            {
                if (hitBrick == false)
                {
                    for (int j = 0; j < 10; j++)
                    {
                        Brick brick = wall.BrickWall[i, j];
                        if (brick.Visible)
                        {
                            Rectangle brickRect = new Rectangle((int)brick.X, (int)brick.Y, (int)brick.Width, (int)brick.Height);
                            if (HitTest(ballRect, brickRect))
                            {
                                PlaySound(gameContent.BrickHit);
                                brick.Visible = false;
                                Score = Score + 7 - i;
                                YVelocity = YVelocity * -1;
                                bricksCleared++;
                                hitBrick = true;
                                break;
                            }
                        }
                    }
                }
            }
            return true;
        }
        public static bool HitTest(Rectangle r1, Rectangle r2)
        {
            if (Rectangle.Intersect(r1, r2) != Rectangle.Empty)
            {
                return true;
            }
            else
            {
                return false;
            }
        }
    }
}
This ball class has some of the components we need . The Rectangle Modules are our basic 2D colliders that will detect if it is getting hit by the paddle, bricks or game border. If it does, it will change velocity depending on the context of the offset and distance traveled. The farther the ball goes, the more likely it is to have a slow travelling rebound.
And that is it for all our components! Now we just gotta go ahead and load everything into our Complete Game1.cs class and run the game afterwards.
Ok. Let's break the components we have down.
All our classes are now seen as instances and can be used in any of the Methods in our main Game1 class. We also have some game logic going on.
The ballsRemaining integer resets the game after it reaches 0. The Brickscleared from our Ball class is being used in an if statement and to also reset our game loop if we win. If the ball goes offscreen, it'll make the "Visible" statement of our ball being drawn in the public override void Draw(GameTime gameTime) Method to be false, then returning it lets us spawn a new Ball after pressing start.
We also have some UI going on with our SpriteFont from earlier now showing through strings. And we now see our MoveLeft() and MoveRight() functions being used in our Update() Method.
Now to discuss the Rectangles. Rectangles are the basic 2D collision and is considered a struct. We have a pretty simple use of where if the ball hits any other 2D textures like the Ball or Bricks, it will bounce off.
If you did everything right, you should be able to run the game by pressing F5 and playing the game.
https://twitter.com/RamiMorrarDev/status/1334398998623358978?s=20
And there ya have it folks! Congratulations. You made your first ever MonoGame game! If you're having a little bit of trouble on anything, I also have a clone of the full game over on my Github!
Tune in next time and see how we can get this bad boy to play in our own browser!
In the meantime if you want to learn more about Monogame, you can head on over to the official MonoGame website with a community page and documentation to help you out with future projects!
If you'd like some more in-depth tutorials and want to know more about MonoGame, I suggest the written guide by MonoGame aficionado RB Whitaker right here:
If you're looking for something a little more affordable and are new to coding, this Beginner C# programming guide with MonoGame by A.T. Chamillard will definitely help you out!
And as always take care and happy MonoGaming everyone!
If you liked this content follow us on Twitter for more!

